Introduction
Tackling drywall projects can be a daunting task without the right tools. When I first heard about the Protmex Drywall Sander with Vacuum Dust Collection, my initial response was one of skepticism. The claims seemed almost too good to be true: a sander that not only simplifies sanding but also minimizes dust? My DIY experience has been filled with tough-to-clean surfaces and sneezing fits from drywall dust. Could this tool really deliver on its promises? I dived in to find out.
Pros & Cons
- Pros
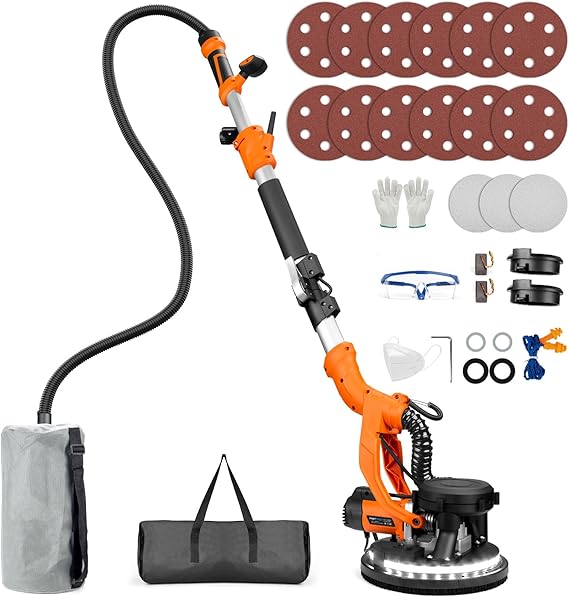
- Powerful 1000W motor for strong performance
- Adjustable speeds ranging from 800 to 2200 RPM
- Built-in vacuum system for efficient dust collection
- Extendable handle reaching up to 6.2 feet for high ceilings
- LED light for better visibility in dark areas
- Detachable edge for maneuvering in tight spaces
-
Complete set of accessories included
-
Cons
- Slightly bulky design, which can lead to arm fatigue during extended use
- The vacuum system, though effective, isn't completely dustless
Comparison
When comparing the Protmex Drywall Sander to its competitors, I looked at other electric sanders like the WEN 6369 and the Tacklife 800W. The Protmex offers a more potent motor (1000W vs. 600-800W) and a higher RPM range, which means it could potentially handle tougher jobs faster. While the WEN offers similar functionality with an extendable handle, its dust collection isn't as efficient as Protmex's, making it less ideal for indoor work. On the flip side, the Tacklife sander is more compact, which could ease the user fatigue issue, though often at the cost of power.
User Tips / Usage Guide
- Start with Lower Speed: Begin with a lower RPM to avoid over-sanding and creating surface inconsistencies.
- Use Proper Safety Gear: Even with vacuum dust collection, wearing a mask and goggles is recommended.
- Adjust the Handle Before Starting: Set the extension pole to your desired length prior to turning the machine on.
- Test the Vacuum: Before beginning a session, ensure the vacuum system is functioning properly by testing it with some loose dust.
- Let the Sander Do the Work: Apply minimal pressure during sanding. The powerful motor is designed to handle the bulk of the work.
- Change Sandpaper as Needed: Keep an eye on the wear of the sandpaper and replace it as soon as it starts to lose effectiveness.
- Clear Dust Bag Regularly: To maintain suction efficiency, empty the dust collection bag after each session.
- Store Parts Carefully: Keep all accessories in the carry bag provided to prevent loss and maintain the tool's lifespan.
Conclusion
After putting the Protmex Drywall Sander with Vacuum Dust Collection to the test, I was surprised to find that, against my initial skepticism, it largely lived up to its promises. Despite some minor shortcomings, like its bulkiness leading to fatigue, it excels in both power and dust collection. This tool is especially well-suited for both home DIYers who frequently tackle drywall projects and professionals who need a reliable sander that can cover large areas quickly.
The impressive performance range, coupled with its array of user-friendly features, makes it a worthwhile investment for those willing to support its cost. Its promise of significantly reduced post-sanding cleanup alone could win over many skeptics, transforming tedious, dusty projects into manageable tasks. Consider the Protmex Drywall Sander if you’re aiming for efficiency and cleanliness in your work.